Monday, October 18, 2010

I Want Candy

Maybe it is the fact that Halloween is approaching, or maybe it is the fact that I just love candy. Whatever it is, I have been craving Hot Tamales, Jolly Ranchers, Sour Gummy Worms… I want candy!!!!

Paper and Cake has instructions for making an awesome candy necklace that would be a great favor for a party or something fun to do with your kids on a rainy day. I think I may just have to make one to much on at work!!

The labels for the favor boxes can be printed from Paper and Cake. I love the cheeky sayings on the labels like “where high sugar meets high fashion” and “take a lick at fashion”. These are just too fun!

image

image

image

images via Paper and Cake

Sunday, October 17, 2010

Dewberry Farms

Today we loaded up after church and took a trip to Dewberry Farms outside of Brookshire. It was such a nice drive and took no time to get there. The weather was perfect and even better than that, the kids were perfect. Jack didn’t mind being in the stroller, and Charlie told us it was better than his trip to Disneyland!! Rex, of course, was thrilled to hear this! I am sure we will be making many more trips here in the future and if you haven’t been, I highly recommend checking it out!

DSC_1949

DSC_1953

DSC_1995

DSC_1963

DSC_1987

DSC_2012

DSC_2019

DSC_2029

DSC_2037

Thursday, October 14, 2010

Jack’s First Birthday

I can’t believe Jack turned one in August. The past year went by so fast and I know that things are not about to slow down anytime soon. The theme for the party was Milk & Cookies and he LOVED the cookies. Let’s be honest…we ALL loved the cookies!

DSC_0081

The birthday boy with Mommy and Daddy. Charlie would not stay still long enough to get his picture taken.

DSC_0080

I found this birthday hat from Tweet Memories three days before the party. I was scared it wouldn’t arrive in time, and was relieved when it arrived the morning of the party. I didn’t get a good picture of Jack’s outfit, but his monogram was stitched in white across the front.

image

I had so much fun working on this custom invitation from Ella Eleanor. She also created custom address labels and labels for the party favors.

DSC_0053

I made the banner above the picture with paper from Paper Source and painted chipboard letters brown. I found a jar of different brown and cream ribbon at Hobby Lobby that I used to tie it together. Rex made the picture with an easy program that you can download here. The final picture can be scaled to any size and prints out on individual  8 1/2 X 11 sheets of paper.

DSC_0061

The Dessert Table

DSC_0062

A close up of the cookies

DSC_0073

I bought these vintage looking glass bottles at Marshalls and filled them with Whole Milk, Skim Milk, Chocolate Milk, Tea, Water, and “Mommy Juice”…those of you who know me, know what that is!! I found the bucket at Target.

I also had Vanilla and Chocolate Organic Milk Boxes for the babies to drink. I don’t even like milk, but the Horizon Vanilla milk tastes just like ice cream. Yum, yum!

DSC_0068

The cake was made by Gay Joines. She did a fabulous job. In the background you can see the cups. I took a picture of Jack and made it a sepia color to tie in with the color scheme. I then cut the pictures into a “tag” shape and tied them onto the cups with brown and white bakers twine. This was very labor intensive, but turned out super cute. Inspiration from A Party Style.

DSC_0091

Delicious!!

DSC_0055

My mom’s friend, Betsy, and I made the pom poms. They were not perfect, but I don’t think anyone noticed when they were hanging up.

DSC_0099

I got the idea for the favors  from Bakerella. I punched tags out of brown cardstock and wrote “Thanks” on the tag with a gold paint pen. The smooth ball jars came Amazon.com and the “Jack’s Cookies” labels were also from Ella Eleanor (directions were on the backs of the jars).

Tuesday, October 12, 2010

Etsy Find: Paper Dolls

I never played much with dolls when I was younger, but I did like paper dolls. I thought this was a fun modern twist on the traditional paper doll. All decals stick to the wall and and can be used again and again.

image

image

These stickers from Mae are made of adhesive fabric.  They are easy to remove and completely reusable. Just peel from the sheet and stick on the wall.They can be scrunched into a ball and will easily un-scrunch and re-apply to your wall, many times over.

Monday, October 11, 2010

Silhouettes

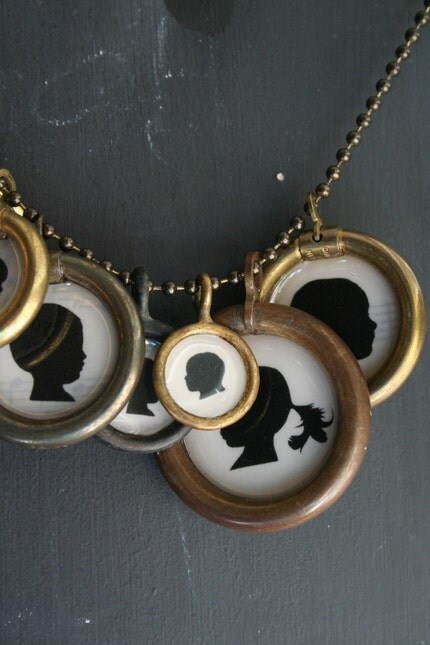
I am absolutely, positively in love with silhouettes. I love how they are so clean. I love how they are so intriguing. I love how they are completely timeless. I took the boys’ profile pictures over the weekend and have two silhouette projects in the works. I am doing one myself and the other is for some jewelry that I have been eyeing for several months now. The jewelry is out of my typical Forever 21 price range, but I think I deserve to treat myself!

Inspiration for the DIY project:


Images via Positively Splendid and Desire to Inspire

And the jewelry that I may soon be sporting:

Lucky Me Beads

Here are some other great silhouette purchases:

Plates, $35

image

Family Silhouette Flat Cards, 24 for $28

image

Custom Pillows, $80

image

Framed Wall Hanging, $50

image

Personalized Flat Note Cards, 16 for $25

image

Silhouette Plate, $55

image

Pillow with Initial, $135

image

Print with Initials, $24

For those of you who would like to try your own DIY silhouette project, easy tutorials can be found at Petit Debutant and Shiso Mama.

Sunday, October 10, 2010

Gingerbread Playhouse

I ran across this over the weekend while looking through the Neiman Marcus Christmas Book. I am sure every kid has dreamed of living in a gingerbread house at one time or another. Leave it to Neiman’s to make it come true with a 6.5 foot by 5.25 foot EDIBLE house!!

Gingerbread Playhouse, $15,000.00

Thursday, October 7, 2010

Let’s Make Whoopie (Pies)!

The Pioneer Woman (or the PW, as she is affectionately known around here) is someone that I wish I could be. She is a true modern day renaissance woman. If you check out her  website, you can see for yourself. She is a photographer, she’s crafty, her recipes are to die for, she lives on a ranch, she’s witty, is a mother of four, AND she homeschools!!! When does this woman sleep???

The favorites from the PW in the Harrison Household are her Perfect Pot Roast, Chicken Pot Pie (with an easy homemade pie crust), Crash Hot Potatoes,  and her Bacon Wrapped Stuffed Jalapenos. All recipes can be found in her cookbook, The Pioneer Woman Cooks: Recipes from an Accidental Country Girl. My friend Laura, made the cinnamon rolls last weekend and we were lucky enough to get a sample. Like everything else, these did not disappoint either.

This weekend I will be making the Pumpkin Whoopie Pies. My mom kindly made these for me last fall and the entire batch was gone in less than 24 hours! I think I ate 90% of them myself and fully intend to do the same this time around as well. Here is a photo and recipe from the PW’s blog, Tasty Kitchen.


Pumpkin Whoopie Pies with Cinnamon Cream Cheese Filling

Ingredients:

  • 3 cups All-purpose Flour
  • 1 teaspoon Baking Soda
  • 1 teaspoon Baking Powder
  • 1 teaspoon Salt
  • 4 Tablespoons Pumpkin Pie Spice
  • 1 cup Melted Butter, Slightly Cooled
  • 2 cups Firmly Packed Brown Sugar
  • 3 cups Chilled Pumpkin Purée
  • 2 whole Large Eggs
  • 1 teaspoon Vanilla Extract
  • _____
  • INGREDIENTS FOR FILLING:
  • ½ cups Butter, Softened
  • 8 ounces, weight Cream Cheese, softened
  • 3 cups Powdered Sugar
  • 1 teaspoon Vanilla
  • 1 Tablespoon Cinnamon

Preparation Instructions

In a medium bowl, whisk together the flour, baking powder, baking soda, salt, and pumpkin spice. In a separate large bowl, whisk together the butter and sugar until well mixed. Whisk in the pumpkin puree until smooth. Whisk in the eggs and vanilla until well combined.

Using a small scoop, drop dough about 1 inch apart on parchment-lined baking sheets. Bake at 350 degrees for 10 to 12 minutes, until the top is slightly crackly and a toothpick inserted into the center of a cookie comes out clean. Let the cookies cool completely on the baking sheets while you prepare the filling.

Filling:

Using your mixer, beat the butter until totally smooth. Beat in cream cheese until combined. Beat in powdered sugar, vanilla and cinnamon just until smooth (don’t overbeat!).

Turn half of the cookies upside down and dollop with 1 teaspoon of the frosting. Sandwich with another cookie, and press gently to even out the filling. Store in the fridge!

Prep Time: 15 minutes                         Cook Time: 50 minutes

ENJOY!!!